Tuesday, November 19, 2013

[Fixed]: 0xc000000e boot error

Post Your Ads on this blog's posts for FREE any place you want !!!

I solved the error problem by repairing MBR and BCD.
Yesterday, after I used Linux in my laptop, I rebooted laptop and tried to boot Windows 8 OS. But, it showed me an error message in a light blue screen : "The boot selection failed because a required device is inaccessible." And later it said windows/system32/winload.exe is corrupt or missing and it suggested me to use windows install USB or DVD to repair the error. I instantly made Bootable Windows 8 USB in desktop PC and booted my laptop using it. I choose the Repair option available below the "Install" button. I then tried Automatic repair but it didn't work. Than, I tried Recovery option but it said "A required device isn't connected or can't be accessed.". Again, I tried to "Refresh Your PC" option; it said "The drive where windows is installed is locked. Unlock the drive and try again."
Now, the last option was CMD as I don't want to loose my files.

SOLUTION:
Choose the command prompt option and follow the steps:
1. bootrec /fixmbr
2. bootrec /fixboot
3. bootrec /rebuildBcd
(choose [y] after it prompts you to choose an option. )
Now, reboot your PC. 
If it works then its perfectly fine otherwise you need to again use Install USB or DVD and choose "Refresh Your PC" option.

You may be interested to read about Saving files before installing new windows
                                                        Top 5 web browsers

Share, Comment, tweet, follow and like..............
Thank you!

Bypass MAC Filter: BackTrack 5

Post Your Ads on this blog's posts for FREE any place you want !!!


Features in this post:

  1. Discussion about MAC filter
  2. Why MAC filter is not a better network security option?
  3. At the end, a technique which will help us to bypass the MAC filter ( Which you can try on your own in your lab)

# This blog is totally a education blog. All the techniques and discussion held here are completely based on lab testing and assessments. I ask blog readers of this blog to use these techniques at their own lab only.

Hello my blog readers! Thanks to you all.

Today in this blog I will be discussing about the "MAC filter for network security" as well as discussing how it is not the better network security option. MAC filter is a technique (old) used for authentication and authorization of host devices in network. Today's hacker and security invaders are so powerful that our MAC filter will be bypassed within 10 minutes ( # time is average and by the use of some specialized software we can reduce this time also.). MAC filter over wired network is still taken as a good option for network security. But here above the term 'network' I mentioned are for wireless network (this will be followed throughout this post so wherever I mention network you must take it as wireless network, otherwise I will mention if I am talking about wired network.)

The basic idea of MAC filter is authenticating users/client on the basis of the MAC address of device trying to access the network. In this technique, access points of network are fed with the list of MAC address that can access the network and whenever any device tries to access the network through access point, the access point searches the MAC address of the device trying to access the network (i.e. wireless receiver device) and if the MAC address exists in the list then it will allow the device to access the network.

It seems very secured, isn't it? But, guys when you look through the view point of a network manager or hacker or networking student than you will find it to be a very loose and weak network security, and can be bypassed easily. But, how is this possible?????

Below is the link of the Facebook page where you will find very interesting tips, tricks and news regarding technology, computer, network... almost everything that is related to computing.

STEPS TO BYPASS THE MAC FILTER

a) Lets setup as access point first:
In this step you have to setup your Access point.
  1. Enable MAC filter in your Access Point

    1. mac filter disabled
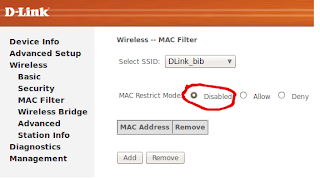
      MAC filter is disabled here
  2. Add at least one MAC address in allow list of MAC address in access point (can be of your Laptop or any wireless receiver or a demo MAC address) (The more MAC address it will be more easy to bypass)
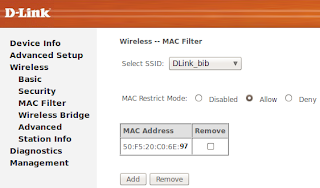
  3. MAC filter enabled and one MAC address is fed.
  4. Enable wireless signal of Access point if not enabled
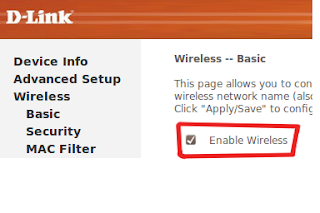
  5. Wireless enabled
(Only allowed MAC address will be able to access the network. If any other devices try to access the network it will fail to connect. When you try to trace the network packets using WireShark or any network packet tracing software you will see the authentication failure message from access point. [Refer this post to learn using WireShark: http://loverofcode.blogspot.com/2013/02/backtrack-5-bypassing-hidden-ssid.html ] Try it with the allowed MAC address device and other device.)

b) Cheating the Access Point
    (Issue the following commands in terminal: You can use [Ctrl] + [c] to copy bold commands and paste in terminal using [Ctrl] + [Shift] + [v] )
  1. ifconfig wlan0 up
  2. airmon-ng start wlan0 (creates mon0 for monitor mode interface)
  3. mon0 created
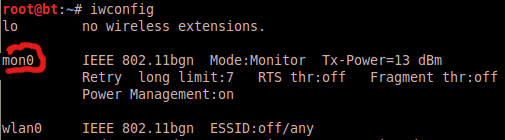
  4. iwconfig (verify if mon0 is created or not: if mon0 exists it is created)
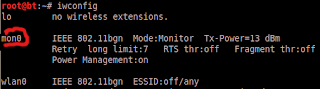
  5. mon0 exists there so its successfully created
    1. airodump-ng mon0 (shows all the access points available)
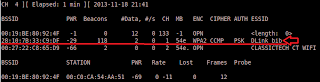
    2. All access points are displayed and our created access point is underlined
      (Open new terminal) 

    3. airodump-ng -c 1 -a --bssid 28:10:7B:33:C9:DF mon0 (syntax: airodump-ng -c <CH (Channel)> -a --bssid <BSSID> mon0 :monitors the BSSID which is of interest to us)
    4. (If any client is connected to the access point than its MAC address is shown over there) 
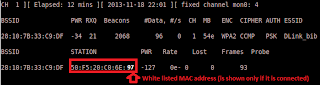
      Only our specific access point is shown (note the MAC address highlighted)
      (You can close the previous/first terminal) 
      (Open new terminal) 

    5. ifconfig wlan0 down
    6. macchanger -m 50:F5:20:C0:6E:8D wlan0 (this changes the MAC address of your device to whitelisted/allowed MAC address)
    7. ifconfig wlan0 up
    Now, connect to the network. You have bypassed the MAC filter successfully.
    Related topics: Bypass Hidden SSID
                            Crack WEP password
    You may be interested to read about Saving files before installing new windows
                                                            Top 5 web browsers

    Share, Comment, Subscribe, Like, Tweet...............

    Monday, November 18, 2013

    Blank Screen or Black Screen after 'Startx' in Backtrack

    Hello readers! Today I am posting this post because I have faced this problem recently while using BackTrack Linux. I made a bootable linux usb and booted using it. Everything went okay until I wrote the command "Startx" for entering GUI of BackTrack R3; my screen went blank/black. Not any GUI items were displayed, neither mouse pointer; any keys of keyboard was not functioning. I than directly turned off my laptop pressing power button for few seconds. I solved the problem. (this problem can be solved by using this post)
    I installed the BackTrack and loaded my BackTrack. But the problem arised again.

    I than booted my laptop using "Ubuntu" and started to search it's solution too and I eventually found the solution to it.

    SOLUTION:

    Before entering command 'Startx'
    1. Enter the command: sudo nano /etc/default/grub (this opens the grub setting file)
    2. Go to line: GRUB_CMDLINE_LINUX_DEFAULT="text splash vga=791"
    3. Add the text: i915.modeset=1 after vga=791 i.e. that line must look like this: GRUB_CMDLINE_LINUX_DEFAULT="text splash vga=791 i915.modeset=1"
    4. Press [Ctrl] + [x]
    5. Press [y] (this saves the grub setting file)
    6. Enter the command: sudo update-grub
    7. Than, reboot the system by pressing command: sudo reboot
    Now, your problem is solved.
    Thank you!
    Please share, like and tweet this post.

    Blank Screen or Black Screen after 'Startx' in Backtrack: LIVE CD / USB boot

    Hello readers! Today I am posting this post because I have faced this problem recently while using BackTrack Linux. I made a bootable linux usb and booted using it. Everything went okay until I wrote the command "Startx" for entering GUI of BackTrack R3; my screen went blank/black. Not any GUI items were displayed, neither mouse pointer; any keys of keyboard was not functioning. I than directly turned off my laptop pressing power button for few seconds.

    I than booted my laptop using "Ubuntu" and started to search the solution and I eventually found the solution to it.

    SOLUTION WHEN BOOTING FROM Live USB or DVD:
    When you select the boot device from Bios pressing specific key in keyboard while starting the computer. You will be given a menu where you can select your options as below:
    You can see that there is written "Press [Tab] to edit options".
    steps:
    1. Press [Tab] when the above screen appears
    2. You will be given the line: .........vga=791--
    3. Change it to: .........vga=791 i915.modeset=1
    4. Press [Enter]
    Now, your problem is solved.

    Tuesday, November 12, 2013

    How to change the automatic boot time in Grub ?

    If you like to use any Linux distribution which installs Grub 2 in your system and you want to make greater or lesser automatic boot time ( The highlighted entry will be booted automatically in 10 seconds. )  than you are in right blog.

    Use this scenario according to your need:

    I installed Ubuntu also side by side(creating new partitions) with Windows OS. When I start laptop my system asks me to select OS to boot and if I don't respond it to 10 seconds than it automatically boots Ubuntu which is my default OS. I want to change the respond time to 15 seconds.
    My Grub Menu

    Solution:

    1. Boot your PC/Laptop/Desktop/Computer and load Ubuntu (or any Linux distribution)
    2. Open Terminal (ctrl + alt + t  => in Ubuntu; if your system is shell or command prompt i.e. not a GUI than got to step 3)
    3. Type commands: sudo gedit /etc/default/grub/
    4. It may ask you to enter your password.
    5. Gedit, notepad like text editior, will open.
    6. Find the line with: GRUB_TIMEOUT=10             (This line holds the response waiting time in seconds.)
    7. Now, change the number 10 to 15 (this is in seconds)
    8. Save it and close
    9. Again, type command: sudo update-grub
    10. Now, reboot your system, you get 15 seconds as response waiting time.
    Thank You! For reading this post.
    If any doubts, you are free to ask in comments.

    Similar Post: 

    How to make Windows OS (or any OS) as default OS in GRUB 2 ?


    Like Share Comment:

    How to make Windows OS (or any OS) as default OS in GRUB 2 ?

    After a long pause, I am back with a useful post for you. If you like to use any Linux distribution which installs Grub 2 in your system and you want to make Windows or any other OS as default in Grub so that if you don't press any key in Grub your PC will get selected OS loaded than you are in right blog. Not only Linux distribution installs Grub; you can manually install grub in your system.

    Use this scenario according to your need:

    I have pre-installed Windows OS in my laptop ( laptop version is not important). Now, I installed Ubuntu also side by side(creating new partitions). But, I rarely use Ubuntu and the problem is when I start laptop my system asks me to select OS to boot and if don't respond it automatically boots Ubuntu which is in the top of my menu. I want to Windows OS to be loaded instead of Ubuntu when I don't respond (select the OS) i.e. change my default OS to Windows OS from Ubuntu.
    My GRUB Menu; windows OS is in 5th position here

    Solution:

    (Before starting the solution please note: How many option are provided in the Grub menu (OS selection menu) when you are booting? The number of line in which your desired OS lies.)
    1. Boot your PC/Laptop/Desktop/Computer and load Ubuntu (or any Linux distribution)
    2. Open Terminal (ctrl + alt + t  => in Ubuntu; if your system is shell or command prompt i.e. not a GUI than got to step 3)
    3. Type commands: sudo gedit /etc/default/grub/
    4. It may ask you to enter your password.
    5. Gedit, notepad like text editior, will open.
    6. Find the line with: GRUB_DEFAULT=0             (This line holds the information of which OS to be loaded as default)
    7. Now, change the number 0 to the number (in my case its 4 for my Windows OS) (get the line number of your desired OS and subtract 1 in it) : Suppose your OS list in Grub as a List and its initial value position will start from 0 i.e. the OS on the top of menu has position value 0 so it loads as default OS previously)
    8. Save it and close
    9. Again, type command: sudo update-grub
    10. Now, reboot your system, you get desired OS loaded as default.
    Thank You! For reading this post.
    If any doubts, you are free to ask in comments.

    Like, Comment and Share:
    Don't forget to View my facebook page: https://facebook.com/fookash